익스프레스 : 웹서버를 만들 때 필요한 파일들을 자동으로 생성해준다.
1단계
app.js 파일에 코드를 쓰자!
하단의 코드를 입력하기 전,
npm init 으로 json파일을 만들고나서
npm install * --save를 입력해서 외장 모듈들을 설치하자
const express = require('express'),
    http = require('http'),
    path = require('path');

const bodyParser = require('body-parser'),
    cookieParser = require('cookie-parser'),
    static = require('serve-static'),
    errorHandler = require('errorhandler');

const expressErrorHandler = require('express-error-handler');

const expressSession = require('express-session');

const app = express();
추가로 .gitignore파일을 하나 만들어서 모든 파일이 git에 커밋되지 않도록 하자
특히
# gatsby files
.cache/
public
에서 public은 빼주도록 하자.
# Logs
logs
*.log
npm-debug.log*
yarn-debug.log*
yarn-error.log*
lerna-debug.log*

# Diagnostic reports (https://nodejs.org/api/report.html)
report.[0-9]*.[0-9]*.[0-9]*.[0-9]*.json

# Runtime data
pids
*.pid
*.seed
*.pid.lock

# Directory for instrumented libs generated by jscoverage/JSCover
lib-cov

# Coverage directory used by tools like istanbul
coverage
*.lcov

# nyc test coverage
.nyc_output

# Grunt intermediate storage (https://gruntjs.com/creating-plugins#storing-task-files)
.grunt

# Bower dependency directory (https://bower.io/)
bower_components

# node-waf configuration
.lock-wscript

# Compiled binary addons (https://nodejs.org/api/addons.html)
build/Release

# Dependency directories
node_modules/
jspm_packages/

# TypeScript v1 declaration files
typings/

# TypeScript cache
*.tsbuildinfo

# Optional npm cache directory
.npm

# Optional eslint cache
.eslintcache

# Microbundle cache
.rpt2_cache/
.rts2_cache_cjs/
.rts2_cache_es/
.rts2_cache_umd/

# Optional REPL history
.node_repl_history

# Output of 'npm pack'
*.tgz

# Yarn Integrity file
.yarn-integrity

# dotenv environment variables file
.env
.env.test

# parcel-bundler cache (https://parceljs.org/)
.cache

# next.js build output
.next

# nuxt.js build output
.nuxt

# gatsby files
.cache/

# vuepress build output
.vuepress/dist

# Serverless directories
.serverless/

# FuseBox cache
.fusebox/

# DynamoDB Local files
.dynamodb/

# TernJS port file
.tern-port

package-lock.json
2단계
하단 코드를 app.js 파일에 추가하자
이 코드는 모듈을 불러온 후 초기화하는 부분이다.
그러나 하단 코드를 작성하면 오류가 생긴다.
app.set('view engine', 'pug');
app.set('views','public');

// 서버에서 사용할 포트 정보를 port라는 이름으로 설정
app.set('port', process.env.PORT || 3000);

// 파싱
app.use(bodyParser.urlencoded({extended:false}));

// 파싱
app.use(bodyParser.json());

// static미들웨어로 특정 패스인 public폴더 접근 등록
app.use('/public', static(path.join(__dirname, 'public')));

// 쿠키 설정
app.use(cookieParser());

// 세션 설정
app.use(expressSession({
    secret:'my key',
    resave : true,
    saveUninitialized:true
}));

const router = express.Router(); // 라우터객체참조

// login routing function
router.route('/process/login').post(function(req,res){
    console.log('/process/login 호출됨.');
});

// router object
app.use('/', router);

// 404 err page
const errorHandler = expressErrorHandler({
    static : {
        '404' : './public/404.html'
    }
});

// 오류 처리에 필요한 모듈
app.use(expressErrorHandler.httpError(404));
app.use(errorHandler);

// Server Start
http.createServer(app).listen(app.get('port'), function(){
    console.log('서버가 시작되었습니다. 포트 : ' + app.get('port'));
});
오류발생
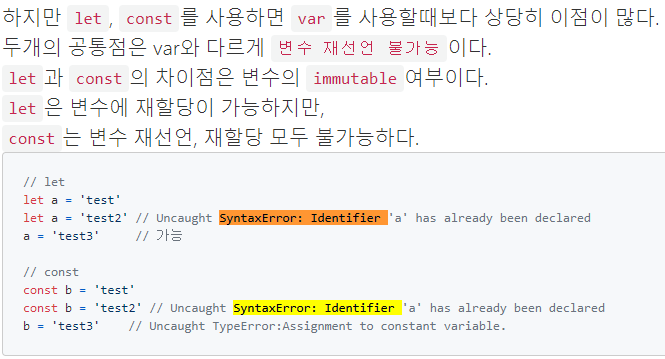
node app.js 를 실행하면
SyntaxError: Identifier 'errorHandler' has already been declared
왜냐?
errorHandler에 대해 이미 선언했었기 때문이다.
그런데 선언할 때 const로 선언해서 문제.
var으로 바꾸도록 하자.

수정한 코드는 다음과 같다.
const express = require('express'),
    http = require('http'),
    path = require('path');

var bodyParser = require('body-parser'),
    cookieParser = require('cookie-parser'),
    static = require('serve-static'),
    errorHandler = require('errorhandler');

const expressErrorHandler = require('express-error-handler');

const expressSession = require('express-session');

const app = express();

app.set('view engine', 'pug');
app.set('views','public');

// 서버에서 사용할 포트 정보를 port라는 이름으로 설정
app.set('port', process.env.PORT || 3000);

// 파싱
app.use(bodyParser.urlencoded({extended:false}));

// 파싱
app.use(bodyParser.json());

// static미들웨어로 특정 패스인 public폴더 접근 등록
app.use('/public', static(path.join(__dirname, 'public')));

// 쿠키 설정
app.use(cookieParser());

// 세션 설정
app.use(expressSession({
    secret:'my key',
    resave : true,
    saveUninitialized:true
}));

const router = express.Router(); // 라우터객체참조

// login routing function
router.route('/process/login').post(function(req,res){
    console.log('/process/login 호출됨.');
});

// router object
app.use('/', router);

// 404 err page
var errorHandler = expressErrorHandler({
    static : {
        '404' : './public/404.html'
    }
});

// 오류 처리에 필요한 모듈
app.use(expressErrorHandler.httpError(404));
app.use(errorHandler);

// Server Start
http.createServer(app).listen(app.get('port'), function(){
    console.log('서버가 시작되었습니다. 포트 : ' + app.get('port'));
});
3단계
로그인 기능 만들기
login.html을 작성하자
DOCTYPE <!DOCTYPE html>
html
    head
        meta(charset="UTF-8")
        meta(name="viewport", content="width=device-width, initial-scale=1.0")
        meta(http-equiv="X-UA-Compatible", content="ie=edge")
        title Document
    body
        h1 Login
        form(method="post")
            table
                tr
                    td:label 아이디
                    td:input(type="passwrod", name="password")
                input(type="submit", value="전송", name="")
4단계
몽고디비를 실행했던 명령 프롬프트 창은 그대로 둔 채
새 명령 프롬프트 창을 열고(즉, VSCODE에 바로 입력하면됨) 아래 명령을 실행하면 노드 서버가 시작된다.
% node app.js
하단 명령어를 입력하기 전에 일단 login.html을 만들어서 public폴더에 넣자.
이제 https://localhost:3000/public/login.html 입력하자
이상하게 pug가 작동하지 않는다
pug의 경로를 public으로 설정했음에도 안된다.
그래서 login.pug를 입력하면 404에러가 발생.
고로 현재는 login.html을 사용하기로 한다.
추후 pug로 동작될 수 있도록 수정해보자
5단계
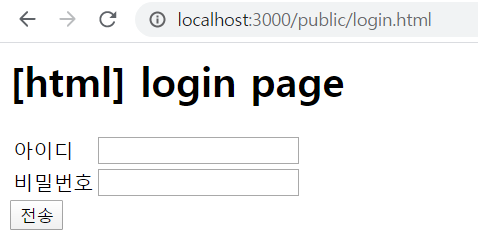
위와 같은 페이지가 나오지만 현재 데이터베이스엔 아이디와 비밀번호가 없기에 두 값의 일치여부를 판단할 수 없다.
이전에 추가한 데이터에는 아디이, 비밀번호 정보가 없으므로 기존 문서 객체 삭제 후 새 문서 객체를 추가한다.
새 프롬프트를 열어서 하단 명령어를 입력해보자
% mongo
% use local
// remove()메소드에 파라미터로 전달되는 JSON객체에 regexp표현식으로, 표시 조건을 넣어서 기존 데이터 삭제가능.% % db.users.remove({name:/sosi/})
// 현재 존재하는 데이터가 출력. 아무것도 안나오면 데이터가 없는 것
% db.users.find().pretty()
% db.users.insert({id:'test01',name:'sosi',password:'123456'})
% db.users.find().pretty()

6단계
아이디와 비밀번호를 추가했으므로 이제 app.js파일에 로그인을 처리하는 코드 추가 가능.
소스 코드에선 셸이 아닌 몽공디비 DB에 연결해야하므로 mongodb모듈을 사용한다.
npm install mongodb --save

7단계
app.js파일 라우팅 코드 윗부분에 다음 코드 추가
// MongoDB module
var MongoClient = require('mongodb').MongoClient;

// declare DB obj
var database;

// Use mongodb module to connect the mongodb database
function connectDB() {
    // DB connect inf
    var databaseUrl = 'mongodb://localhost:27017/local';

    // DB connect
    MongoClient.connect(databaseUrl, function(err,db){
        if(err) throw err;

        console.log('DB connect : ' + databaseUrl);

        // allocate DB variable
        database = db;
    });
}


//===== start server =====//
http.createServer(app).listen(app.get('port'),function(){
    console.log('start the server. port : ' + app.get('port'));

    //connection database
    connectDB();
});
//===== compare id to password
// Function that authenticates the user
var authUser = function(database, id, password, callback) {
console.log('authUser 호출됨.');
// users 컬렉션 참조
var users = database.collection('users');
// 아이디 및 비번 사용 통한 검색
users.find({"id":id,"password":password}).toArray(function(err,docs){
if(err) {
callback(err,null);
return;
}
if(docs.length > 0){
console.log('아이디 [%s], 비밀번호 [%s]가 일치하는 사용자 찾음.', id, password);
callback(null, docs);
} else {
console.log("일치하는 사용자를 찾지 못함");
callback(null,null);
}
});
}
'○ WEB > 19.07 BoostCourse_DB연결 웹앱' 카테고리의 다른 글
| [6.DB] mongoDB 다운 / 데이터 추가 / 데이터 조회 (0) | 2020.01.14 |
|---|---|
| [웹기초 BE_Servlet] Servlet 정리 (0) | 2019.07.19 |
| 7. mar (0) | 2019.07.18 |
| 6-2 DML (0) | 2019.07.18 |
| [에러/해결] ERROR 2003 (HY000): Can't connect to MySQL server on 'localhost' (10061) (0) | 2019.07.17 |


